Stair Handrail Kits: How Long the Rail Needs to Be
Aging Parent Rescue is a participant in the Amazon Services LLC Associates Program. We may earn a commission when you buy through links on our site, at no extra cost to you.
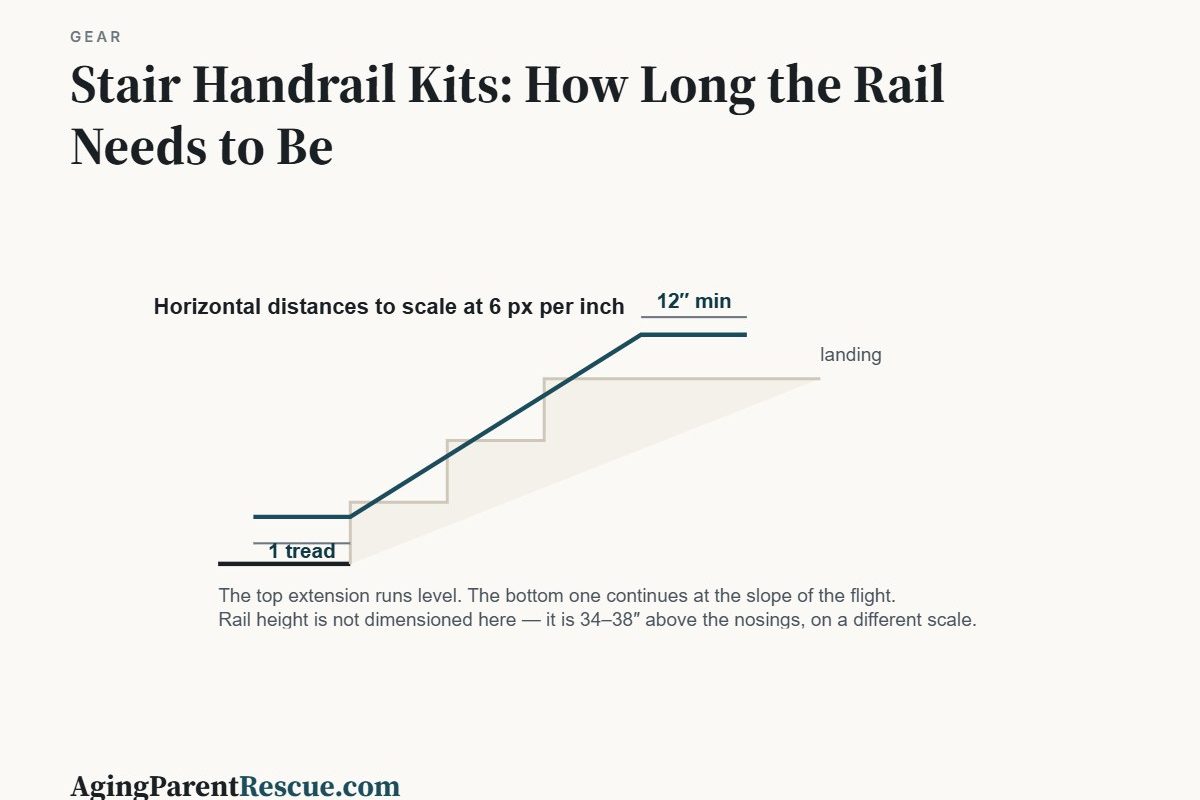
How far a handrail should run past the steps: at least 12 inches horizontally beyond the top riser, and at least one tread depth beyond the bottom one. A kit sold as a “3-step handrail” usually spans exactly three steps and stops, which takes the rail away at the two moments a person most needs it.
ADA Standards for Accessible Design §505.10.2 (top extension) and §505.10.3 (bottom extension).
Bolt-on handrail kits are a genuinely good buy. They cost a fraction of joinery, most of them go on in an afternoon, and a rail on the back steps is one of the highest-value safety changes available outside a bathroom.
They also share two predictable failures: they are too short, and they are fixed into the wrong thing. Both are avoidable if you know before ordering rather than after.
Where the rail has to start and stop
So measure the flight and then add to it. Three steps at an 11-inch tread is not a 33-inch rail; it is that plus a foot at the top and most of another at the bottom. Kits are sold by step count, so this usually means buying the next size up.
The extensions should also finish properly. A rail that ends in mid-air catches sleeves and bags; returning it to the wall or down to the post is a small detail that prevents a specific, common accident.
Height: measured from the nosings, not the ground
The gripping surface sits 34–38″ above the nosings — the front edges of the treads — and at a consistent height the whole way. Measuring from the ground at the bottom of the steps gives a rail that is too low at the top, which is the one place a rail must be right.
The full detail, including what to do where the two ends disagree, is here: handrail height, and how to measure it.
What you are actually fixing into
This decides whether the kit is worth anything, and it is the part the listings are vaguest about.
Concrete steps. The bolts supplied are usually too short and often plain screws. Use expansion anchors or chemical resin anchors sized for the post plate, drill to the depth the anchor specifies, and clear the dust out of the hole — resin in a dusty hole holds a fraction of its rating. Keep anchors well back from the edge of the concrete, or the step spalls and takes the rail with it.
A timber deck or wooden steps. Through-bolt into framing, not into decking boards. A board is a spacer, not a structure; it will feel solid on installation day and work loose across a winter.
Brick. Fix into the brick, not the mortar joint, with anchors rated for masonry.
An interior wall. Into studs. If the studs are not where the brackets want to be, fit a timber backing board across several studs and mount the rail to that.

Best for most outdoor steps
Metty Metal Handrail for Outdoor Steps, 3 Steps
The deepest review history among bolt-on step rails, which in this category is the useful signal — these fail slowly, at the fixings, and only long-term owners report that. Size up from your step count so the rail can run past the top and bottom.
- Sized by step count; also sold for 2, 4 and 5 steps
- Powder-coated steel, for outdoor use
- Supplied fixings are a starting point — match them to concrete or timber
Rating and review count checked on 15 September 2026. Price is not shown here because it changes; the button opens the current listing.

If the steps are an awkward run
VEVOR Adjustable Outdoor Handrail
Adjustable geometry, which earns its place when the steps are uneven, the rise is irregular, or the run does not match any kit’s step count. More assembly than a fixed rail, and more places to check for slack after the first winter.
- Angle and length adjust rather than being fixed
- Suits irregular or non-standard step runs
- Check the stated load rating against how the rail will really be used
Rating and review count checked on 15 September 2026. Price is not shown here because it changes; the button opens the current listing.
Indoor wall-mounted rails
Inside, the kit is usually a length of rail plus brackets, and the work is all in the fixing. The rail itself should be continuous along the flight, with nothing on top of it or at the sides to interrupt a sliding hand — which rules out the decorative brackets that clamp over the top of the rail.

Indoors
Indoor Metal Stair Handrail Kit
A plain wall-mounted rail with under-slung brackets, which is what you want: nothing interrupting the top of the grip. A shallower review history than the outdoor kits, so check the bracket spacing against where your studs actually are before ordering a length.
- Brackets mount under the rail, leaving the top clear
- Sold in lengths — measure the flight plus both extensions
- Into studs or a backing board, never into plasterboard alone
Rating and review count checked on 15 September 2026. Price is not shown here because it changes; the button opens the current listing.
The grip itself
A rail is only useful if a hand closes round it. The same dimensions that govern grab bars apply: a round rail wants an outside diameter of 1¼–2″, with at least 1½″ of clearance between the rail and the wall so fingers can wrap underneath.
Wide flat timber rails, the kind that look like a shelf edge, fail this badly. A hand can rest on one but cannot grip it, and resting on a rail does nothing at the moment a foot slips.
When the kit is up, put your own weight on it — downwards and outwards, at the top, the middle and the bottom — and watch the fixings rather than the rail. Any movement at a bracket means the fixing is wrong for the material, not that the bolt needs another turn. Re-check every fixing after the first frost and then annually, because outdoor anchors loosen as water gets in and freezes. And if the person is already unsteady enough that the rail is the only thing keeping them upright on those steps, the rail is a stopgap: that is a conversation for their doctor or an occupational therapist about whether the route should be used at all.
One side or both
If the flight is narrow enough to reach both walls, two rails are better than one, and a second rail is the cheapest upgrade available once the first is in. Where only one is possible, put it on the side of their stronger arm going down, because descending is when falls happen and the descending hand does the work.
For the flight as a whole — lighting, nosings, what to do with a turn at the bottom — the stairs have their own page: stairs, in the order worth fixing them. If the steps outside are the problem and a rail is not going to be enough, the next question is usually a ramp: matching a threshold ramp to the rise.
One last note on the standard quoted at the top. It is written for public buildings and does not apply to a private home: what the ADA does and does not require at home. The extension figures are still the best guidance available, they cost only a longer rail, and they address the exact moments where the flight is most dangerous.